

When connecting a new internal or external drive with your system, one common issue that may arise is not seeing your drive appear on your system. When this occurs, manually formatting your drive is one important solution that can help connect your storage drive.
In this article, we will discuss how to manually format drives with detailed steps for each operating system to ensure an easy formatting process for all users.
How to Format a Drive on PC (Windows 11)
1. After connecting your drive to your system, open the Search menu in the bottom left of your screen.

2. Type "Run" into the Search menu and open the app entitled "Run". It will appear as shown below:

3. In the open box, copy and paste the following command into the box: “compmgmt.msc “
After pasting it into the box, click "OK".
4. After clicking "OK", the Computer Management tab should open. On the left side of the screen, navigate to Storage and click on Disk Management.
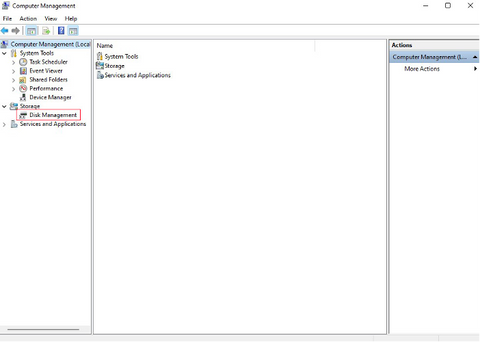
5. Once in Disk Management, you should see your drive, appearing as "Unallocated". Right click on the drive you want to format, and select New Simple Volume.

6. After clicking on New Simple Volume, the New Sample Volume Wizard should appear. After reading the introduction, click "Next".

After this, New Sample Volume Wizard will ask you to specify volume size. To continue, make sure that simple volume size is set to the maximum disk space available. After confirming this, click "Next".

7. On the next screen, you will be asked to assign a letter to the drive. After selecting any letter with the settings as below, click "Next".

8. On the next screen, you will be asked about formatting this volume and settings for it. For this step, if using a modern Windows operating system, select the button "format this volume with the following settings", and select "NTFS" from the drop-down menu. Additionally, select "Perform a quick format". After these steps, click "Next". This section should appear as shown here:

9. After confirming your disk settings are correct, click "Next". Following this, a page should pop up confirming you have completed the New Simple Volume Wizard. Click "Finish".

10. After exiting New Simple Volume Wizard, check your Disk Management again. You should see that your drive is now formatted and ready for use.

How to Format a Drive on Mac
1. When attempting to use a drive with your Mac device that needs formatted, you may see the following message appear:

2. Navigate to the Finder in the bottom left corner. After opening it, search "Desk Utility". It should appear as the following icon:

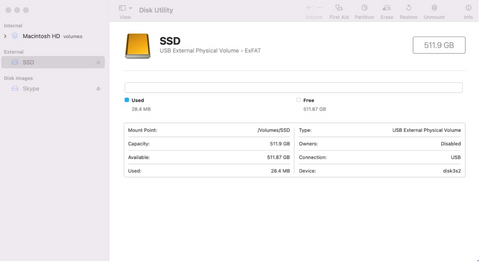
3. Once in Desk Utility, look for your drive listed under "External" on the left side column. Click on your drive you're attempting to format.

4. Once you select the drive you're formatting, click "Erase". Please note that before you click "Erase", check your drive to make sure there are no files that you need to keep. Doing this is very important for non-new drives to ensure that they can be correctly formatted.

5. After selecting "Erase", you may name your drive anything you choose. Below Name, it will ask for a format. Format selection is very important to consider, as its form can vary depending on your needs. Refer to this table below to ensure you pick the right format.
| Format Name | Format Description |
| AFPS | Format as AFPS if your Mac was made from 2017 to 2023 and if you will only use this drive on Mac. |
| Mac OS Extended | Format as Mac OS Extended if your Mac was made before 2017 and if you will only use this drive on Mac. |
| exFat | Format as exFat if you plan on using your drive on both Windows and Mac. |
6. After confirming you have selected the correct settings for your drive (as pictured below) and checked your drive's storage for any files you want to keep, click Erase.

7. The drive will now format. Once it is finished formatting, click "Done". After this, you will return to the Disk Utility menu and see your selected drive. You will notice that it is listed as the name you gave it and connected to your system.


Leave a comment
This site is protected by reCAPTCHA and the Google Privacy Policy and Terms of Service apply.